
Menu

Most homeowners have the same question after they get a quote: "That's a lot — what am I actually paying for?"
The honest answer is, most of it is prep. A clean two-coat finish on bedroom walls is the easy part. The work that determines whether your paint job still looks crisp three years from now happens before the first brush stroke.
After more than 20 years painting Victoria-area homes — from heritage Oak Bay bungalows to new West Shore townhomes — here's what good interior prep looks like in practice, and what to ask before you sign with anyone.
Every quality interior paint job starts the same way: everything in the room is either removed or sealed. No exceptions.
Beds, dressers, bookshelves, electronics — all of it gets covered with fresh poly sheeting taped at the seams. Cheaper crews drape an old sheet over the middle of a couch and call it done; the result is paint mist on every exposed surface and a frustrated homeowner the next week.
In our crews, the rule is simple: if you don't want it painted, it doesn't get a corner showing. Plastic goes over the top, wraps the sides, and tucks under the legs. It takes longer up front and saves hours of cleanup later.

Drop cloths come down before paint goes up. We use canvas drops on hardwood and engineered floors (less slip, no plastic-burn from sun-warmed windows) and poly sheeting in stairwells and high-traffic paths.
A good prep day will use more drop cloth than you'd think necessary — covering not just the floor directly under the work but the whole walking path between the room and the front door. Paint travels on shoe soles. Drops travel with us.
This is where amateurs and pros separate fast. Real edge prep means painter's tape on every line that meets a different colour or material — baseboards, crown molding, door frames, window casings, ceiling lines. Tape is pressed down with a putty knife or a fingernail, not just laid on. A loose edge bleeds paint underneath every single time.
We also remove outlet and switch covers (rather than painting around them), tape off heat registers and smoke detectors, and bridge plastic film from tape lines down to the floor in cut-in zones so roller spray never reaches the baseboard.
Walls almost never come to us perfect. Before we open the first paint can, every visible defect gets handled: nail holes filled with lightweight spackle and sanded flush; cracked drywall seams opened, taped, and re-mudded; stains sealed with a stain-blocking primer so they don't bleed through; and loose or peeling old paint scraped back to a stable edge and feathered with sanding.
These are small things on their own. Together they're the difference between a wall that looks newly painted and a wall that looks new.
A lot of paint failures actually start as dust adhesion failures. Sanding patches, prepping baseboards, even just walking around with drop cloths kicks fine particles into the air. Our crews vacuum and damp-wipe surfaces immediately before priming, and we time prep so the heaviest dust generation happens at the start of the day. By the time we're cutting in trim, the air has settled.
If your painter is sanding and rolling in the same hour, you're getting dust trapped under the topcoat. It will look fine for a few weeks, then develop a chalky texture as it cures. There's no fixing that without redoing the wall.
The actual painting starts with cut-in lines — brushwork along ceilings, baseboards, and corners — done before the rollers come out. A clean cut line set by hand is what makes the room look professional from across the space. We cut in one wall at a time and roll it the same hour, so the brush and roller paint blend wet-on-wet. If you let cut lines dry before rolling, you get a visible "picture frame" effect on every wall.
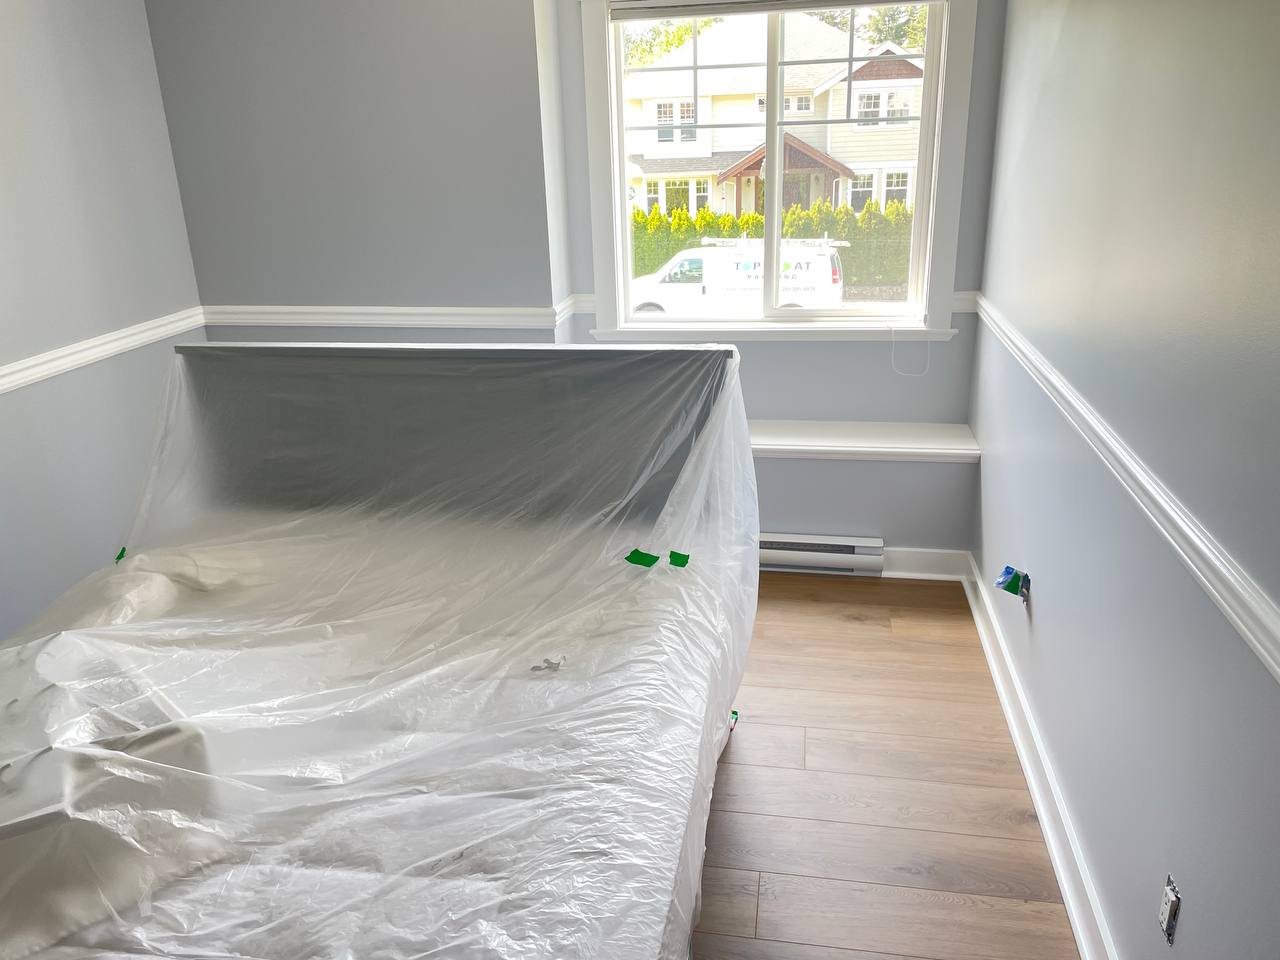
In a recent Victoria bedroom we just wrapped, prep looked like this: bed and bedroom furniture wrapped tight in poly so nothing got touched; crown molding masked at the wall line and freshly painted in white; drop cloths stretched all the way out the door (old paint speckles on them are honest evidence they're working tools, not display props); the TV unmounted and placed on the prepped bed; outlets removed; baseboards taped; heat register sealed.

When you walk into a properly prepped room, you should barely be able to see the original surfaces. That's the goal.
Before you sign with anyone, ask:
Vague answers on any of these are a warning sign. The crew that prepped the room you're standing in is the crew you're hiring.
Top Coat Painting has been painting Victoria-area interiors — bedrooms, kitchens, full repaints, heritage restorations — for over 20 years. Fully WCB-covered. $5 million general liability. Three-year written warranty on every job we book.
If you're thinking about an interior project this season, call (250) 385-0478 or request a free quote here. We'll walk through the space with you, talk through prep, and give you a straight number.
Top Coat Painting serves Victoria, Esquimalt, Saanich, Oak Bay, Sidney, Langford, Colwood, Sooke, View Royal, Central Saanich, and the Gulf Islands. Fully insured. WCB-active since 2005.


